
Learn more about how the Storyboard tab is the heart and soul of Inphlu and the hub for social media content creation and sharing.
Summary
The Storyboard tab is the main tab in Inphlu since it's where you go to create, share, approve, reject, and schedule content for all of your social media accounts. So if you want to be active on social media, expand your online voice, earn achievements, and climb to the top of the Leaderboard, the Storyboard tab is the place to go!
Overview

The Storyboard tab may appear a little intimidating at first glance, but once you start to take a bit of a closer look at it, you'll come to find it easy to follow and understand. The Storyboard can be broken down into the following sections:
- Generated Posts
- Post Overview
- Edit Posts
- Approved & Rejected Posts
- Created Posts
- TikTok Posts
- Shared With Me
- Archived Posts
Note: If you're an Enterprise user and don't see a few of these as options, you may have your ability to generate and create posts restricted by the Enterprise Admin.
Tip: If you would like to sort out the posts on the Leaderboard so that you only see posts from one particular section, use the All Posts dropdown in the top right of the page.
Generated Posts
The Generated Posts section takes up the top part of the page and houses all of the content that the Inphlu platform has generated and curated for you based on the keyphrases and topics you want to focus your posts on.
These generated posts are a great place to start by quickly finding posts with great SEO and publishing them to your social media accounts as you begin to understand what makes up a good post and learn to create your own posts.

To begin generating your posts, all you need to do is click the Generate Posts button in the top right of the screen, and you'll get the Generate Posts pop-up pictured above.
In this pop-up, you will choose your industry from Inphlu's list of over 120 different supported industries. Once you've found your industry, you'll see ten keyphrases populate below in the Suggested Keyphrases section. These keyphrases are some of the top-searched topics within that respective industry.
To generate your posts for the month, you'll have to choose or create anywhere from 1-5 keyphrases. The keyphrases you choose by checking the box next to them will appear on the right side of the pop-up under the Tags section.
As hinted at before, you can choose some or all of your keyphrases from what's suggested to you, or you can use those suggested keyphrases as a starting point to brainstorm and create your own keyphrases. To make your own, click and type in the Tags box and hit Enter on your keyboard when you're done. You'll see your created keyphrase appear highlighted in the Tags box.
Note: If you decide to use five keyphrases to generate your posts, you don't have to choose all five from the suggested keyphrases or create all five keyphrases yourself; you can have a mix of both!
Speaking of keyphrases, though, if you're not quite sure what keyphrases are yet, think of them this way - keyphrases are best thought of as what you would type in on Google, Bing, or Yahoo to search and find more information about a specific topic. Keyphrases are used similarly on Inphlu by acting as the topics and ideas you want your posts to be centered around for the month. Remember, though, that you can only choose five keyphrases to generate your posts.
Note: If you need help deciding on what you want your posts to be focused on during the month, don't worry. You can regenerate your posts again and swap some or all of the keyphrases you used previously.
The Exclude Tags below the Tags box are best thought of as negative keyphrases - topics and ideas that you do not want Inphlu to pull from or suggest to you when it curates your posts. As you go through the post-approval and rejection process, you're likely to build this section up as you find sources you don't really care for, so if you don't have anything to put in this box right now, don't worry about it.
The Post Signature box allows you to put in a recurring signature and have it automatically appear at the bottom of every post that gets generated for you. If you need to figure out what a post signature is, think of a post signature as the same thing as an email signature but only for posts!
Note: If you don't want a post signature, that's fine, too!
Also, as you may have noticed, there's a button next to the Post Signature box to shorten a URL. So if you want to include a URL in your post signature, you can shorten it to track the clicks you're getting from it more easily.
The Post Count at the bottom displays an estimate of how many posts could be generated and curated for you based on the keyphrases you selected and put in the exclude tags used. To increase this number more, choose different keyphrases or remove some Exclude Tags.
Once you've chosen your 1-5 keyphrases and are happy with how everything else looks, click the Generate Posts button in the pop-up to generate and curate your posts!
While the posts are being generated, you'll notice that the message that pops up will tell you how many remaining times you are able to generate posts for the month. A limit is put in place to help give you keep accurate month-to-month analytics.
After about a minute, your posts should be generated, and you should be ready to start approving and rejecting posts!
Note: Inphlu will, by default, generate and curate 30 posts for you - one post for each day of the month. Each day, Inphlu will generate and curate one less post for you until the month ends, at which time it will generate and curate 30 posts for you again.
Note: The keyphrases you used to generate and curate your posts will appear at the top of the Storyboard and list how many posts were created using each.
Post Overview
Before you go about approving and rejecting posts, it's important for you to understand what you're looking at with each post suggested.

This image gives a good overview of what a typical post looks like on Inphlu.
Going from the top of the post down, you have the post's visual element (image, GIF, or video), and then you have the Title of the article/post. Both the visual element and article title of the post can be pulled from the next item, the source of the post. Below the source, you can see the social media accounts linked to your Inphlu account and what linked social account(s) the post would go to if approved. Next, you have the suggested date and time for the post to be published, and finally, the Approve and Reject buttons.
Note: If a social media icon is lit up, then that means the post will go out to that social media platform. If it's grayed out instead, the post will not be published on that social media platform.
Tip: You can toggle which social media accounts are lit up or what social media platforms the post will go to by clicking the different social media icons. This is an excellent way to manage your posts and control which posts go to which social media platform.
The tool tray at the top right of the post gives you the option to edit the post, preview the post, share the post, and select it for bulk action.

Suppose you were to click on the eye icon in the tool tray for the post. In that case, you'll be able to preview the post and get a general idea of what the post would be like on any social media platform with the Caption, hashtags, visual element of the post, Title of the article/post, and the source of the article/post, in that order.
Edit Posts
While looking at your posts, if you see something you would like to change, you can do so by clicking the pencil icon in the tool tray of every post.

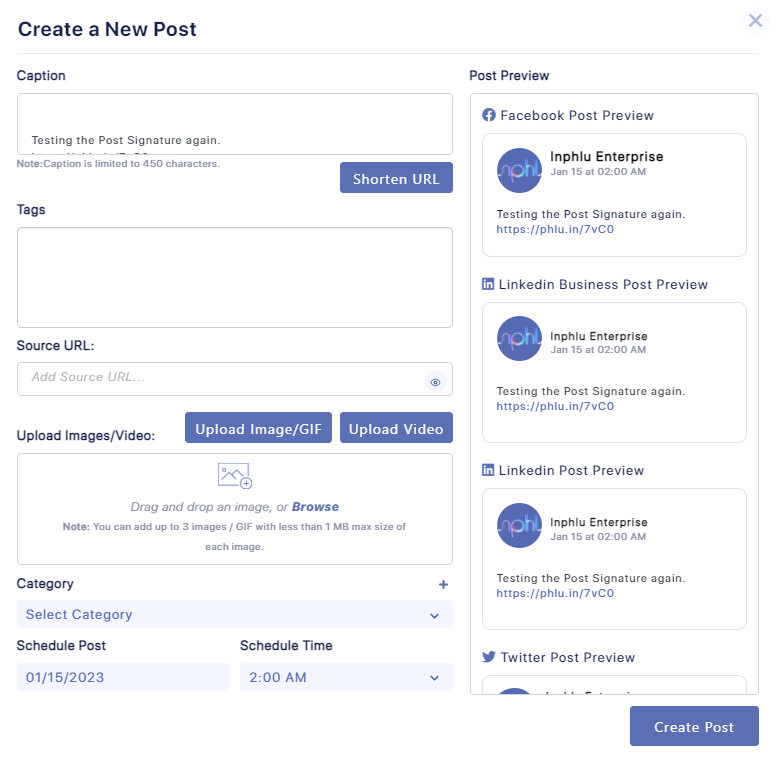
Once the pencil is clicked, it will bring up the Edit Post pop-up, which shows you every part that comes together to make a post. This includes many of the features we discussed in the preview, but this time, you can edit all of that post to reflect you and your online voice better. To briefly go through what each part is about:
- The title is the Title of the article linked/URL put in the Source URL box. Think of the Title as being the headline of an article. Also, if there is nothing in the Source URL box, the Title box will not appear.
- The Caption is what the post will actually say when it gets published. It's the text portion of a post. Like the Post Signature, you can also shorten URLs here so that you can track what clicks your links get.
- The Tags are your hashtags. As you may notice, there will be a keyphrase in every generated post. The keyphrase you find in the Tag box is the keyphrase used to generate that post for you. You're free to remove the keyphrase as a tag if you would like, and you can add as many tags as you would like.
- The Source URL box is where you put a link/URL to attach to your post. These links/URLs are likely what you want users to see in your post and click on. The link/URL put into the Source URL box will be pulled from to fill out the Title and Image.
- The Upload Images/Video section is where you upload and attach the visual content for the post. This can be images, a GIF, or a video. If you upload images, you can upload up to 3 images to any generated post and 4 to any created post. If you upload a GIF, you can only upload one. You must ensure that both images and GIFs are less than 1 MB in size. If you upload a video, you can only upload one, and the video has to be less than 200 MB in size and be either an .mp4 or .WebM filetype.
- The Category dropdown allows you to create categories to assign to posts to make them easier to find and navigate.
- The Schedule Post & Schedule Time areas allow you to choose the date and time the post should be published.
- The Post Preview section allows you to see how the post would look on each of the social media platforms you have connected to your Inphlu account. These post previews update in real-time as you add and remove stuff from the post.
Just so you know, if you don't see the option to edit a post, please look to see if the post has editing restricted because if it does, then that means the post sharer restricted editing for the post.
If you make any changes to a post, make sure to click the Edit Post button!
Approving & Rejecting Posts
Once you're done viewing posts and editing them to your liking, you'll want to make sure to either approve them so that they get scheduled and published or reject them so that the post generation and curation can become more refined to your liking.
To approve a post, click the Approve button below to approve it and schedule it for the date and time it lists. Once that date and time pass, the post will automatically be published to all social media accounts connected (and are lit up). Once approved, a post moves from the Pending Posts section to the Approved Posts section, which can be accessed by clicking at the top of the page.
To reject a post, click the Reject button below the post to reject it and choose your reasoning for rejecting the post. In the pop-up, you can decide why you're rejecting the post - it can be for the content and the source. If you choose the source as a reason - to help prevent more articles from being curated from that source - that source will be put down as an exclude tag. It's important to reject the posts you don't like or want to post since it tells the built-in AI of Inphlu what you do and don't like, so in the future, it can curate more content that matches what you like - thanks to machine learning. Once a post is rejected, it moves from the Pending Posts section to the Rejected Posts section, which can be accessed by clicking at the top of the page.
Tip: If you would like to bulk approve or reject posts, you can check the checkbox for the posts you want to approve or reject and then click the Approve or Reject buttons that appear near the top of the page.
Tip: If you aren't sure about a post and either approve or reject it, as long as the date and time on the post haven't passed, you can come back later on and reject the approved post or approve the rejected post.
Created Posts
Once you've got a good grasp on the format of posts and what makes a good post, you may want to create some of your own posts from scratch or some corporate/personally branded content. The Created Posts is the right place for you!
To access the Created Posts, click the Create New button at the top of the page, and you'll be greeted by a pop-up with nothing but blank boxes and sections with titles. These different boxes and sections were already explained under the Edit Post section of this article, so if you would like to check out what each of these boxes and sections means, make sure to go up to that section.
The create a post pop-up window allows you to start with a clean slate and build your post from the ground up. The Post Previews on the side will be especially handy as you brainstorm and put together your post.
Once you're happy with how the post looks, make sure to click the Create Post button to have the post created. Once the post is created, it'll appear as approved in the Approved Posts section of the Storyboard, which you can click on at the top to access.
TikTok Posts
TikTok is one of the social media platforms that you can create content and publish to through Inphlu. Content works a bit differently from other social media platforms in that it has a few more limitations attached to it.
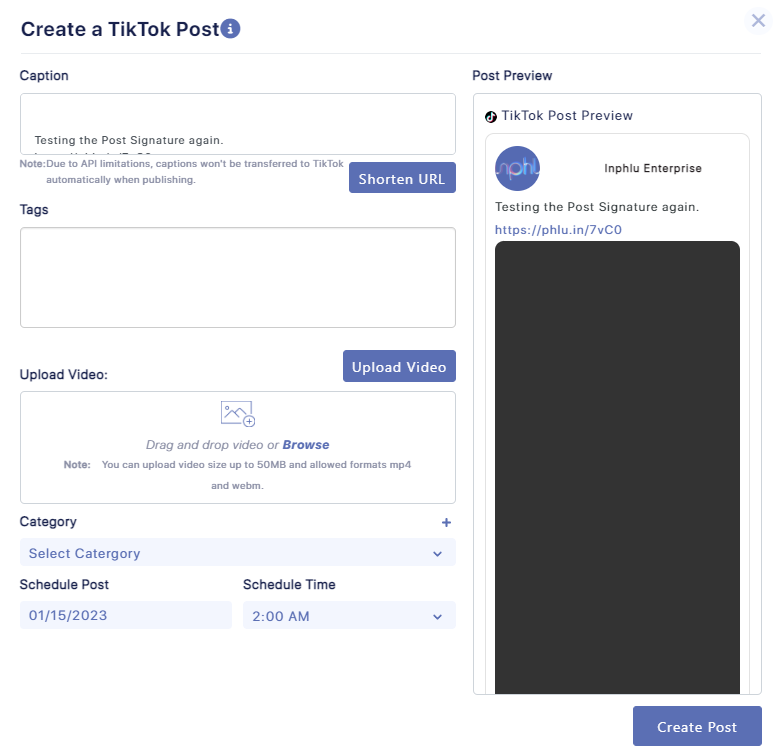
To create a TikTok post, click the Create a TikTok button at the top. You'll then see a pop-up similar to the Created Posts pop-up in that the boxes and sections are blank so that you can build the TikTok post from scratch. The Post Preview on the side will help you decide what would look good to publish to TikTok.
As mentioned before, there are a few different limitations that TikTok has:
- TikTok posts don't publish automatically. Instead, when a scheduled TikTok post is published, you'll get a TikTok notification letting you know it's ready to be published. When the notification is clicked, you'll be taken into TikTok and have the option to make last-minute changes before publishing.
- For this to work, though, the TikTok account that you're trying to publish content to must be connected to your account, and logged into the TikTok account on your phone.
- Due to API limitations, captions won't be transferred to TikTok automatically when publishing, so when a scheduled TikTok post is set to be published, try to copy the caption in Inphlu and paste it into the Caption box when making last-minute changes to the post in the TikTok app.
- To upload a video to Inphlu for TikTok, it must be a vertical video between 3 seconds and 3 minutes in length and less than 50 MB in size.
- The only formats TikTok allows to be published through Inphlu are .mp4 and .WebM file types, so make sure the video you're trying to upload to Inphlu to publish to TikTok is either of those two formats.
Once you're happy with your TikTok post, click the Create Post button! Similar to other created posts, created TikTok posts will automatically appear in the Approved Posts section of the Storyboard.
Note: If you're an Enterprise user and don't see the Create a TikTok button, TikTok may not be allowed to connect due to restrictions put in place by the Enterprise Admin.
Note: To create a TikTok post and publish it, you must have connected your TikTok account to Inphlu.
Shared With Me
The bottom section of the Storyboard tab is the Shared with Me section, which comprises all of the posts shared with you by other users. The different types of shared posts include:
- Individual Content - content someone shared just you, which can be identified if there's just the sharer's profile picture attached to the shared post
- Team Content - content someone shared with you and a team, which can be identified if there's a group icon next to the sharer's profile picture on the shared post
- Company Content - content someone shared with you and the whole company, which can be identified if there's a building icon next to the sharer's profile picture on the shared post

For posts to appear in the Shared With Me section, a post must be shared first.

To share a post, check the checkbox in the tool tray for each post you would like to share with others. Next, you would click the Share button that appears near the top, and a pop-up will appear with different options for whom to share the content with. These are the options for sharing Company Content - this is how you share content with a whole company if you have an Enterprise account. Other options include sharing with:
- Company Teams - share content with the teams you've created
- Teams & Individuals - Enterprise accounts may create special teams of users, in which case, they would then choose which Team of users they would like to share the content with. You can also share content with individual users by typing in the recipient's name or email address in the box below Share to Contacts.
Tip: If you would like to share content with others but don't wish them to be able to change anything around with it, you can check the Restrict Editing option to prevent anything from being able to be changed with the shared post.
Archived Posts

Archived Posts is simply another section at the top of the Storyboard that shows all of the content that you've published in the past. Think of the Archived Posts as the library or archive of all the content you've published through Inphlu.
Professional and Team users may not see the Archived Posts available to them offhand, but they will soon be able to keep a library or archive of all of the content they've published through their Inphlu accounts.
The Storyboard tab has many features, but it's also where the core functionality of Inphlu lies. Once you've approved and scheduled some posts, you'll want to head to the next tab to see your content calendar; the Post Calendar tab!