
Learn more about how as an Admin of an Enterprise account, you have the ability to completely control who's added to your account, what they can see and do, and what responsibilities they have through the Company Details tab.
Summary
The Company Details tab is where an Enterprise Admin visits to add users to their account, putting restrictions on what added users could do on Inphlu, assigning responsibilities to trusted users, and managing their Inphlu Enterprise accounts. In addition, the Teams section of the Company Details allows Enterprise Admins to group users to make sharing content with specific users easier.
Company Details
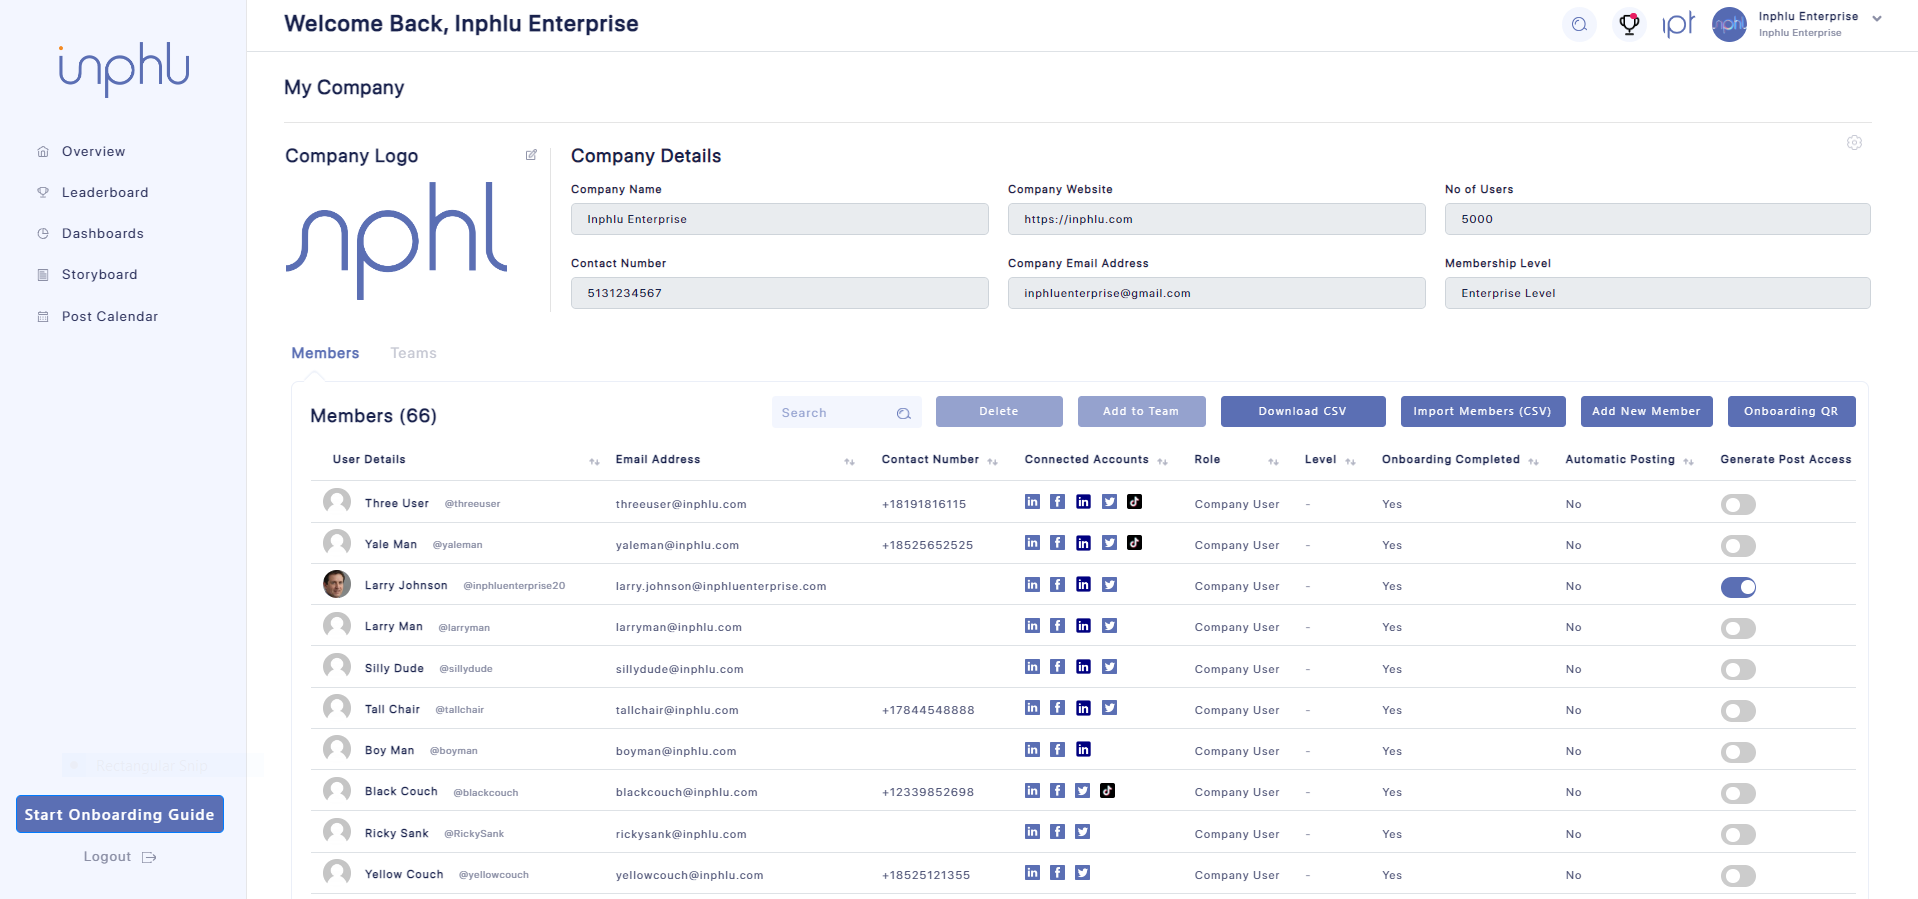
The Company Details is the ultimate tool for Enterprise Admins to use to manage the users they’ve added to their Inphlu Enterprise account and check the overall health of their Enterprise account. The Company Details is exclusive to Enterprise Admins and other similarly related roles.
At the top of the Company Details, the Enterprise Admin can see the organization’s logo, which they can swap out at any time by simply clicking on it. They can see some other basic information about their organization in Inphlu, like their name, website, email address, and contact number. The number of users the Enterprise Admin can add to their account is listed at the top under Number of Users.
Note: All of the information about the organization found at the top of the Company Details was put in during the initial onboarding of the Enterprise account. This information can be changed by reaching out to the Inphlu Team.
The table that takes up the majority of the Company Details is the list of all the current users added to the Enterprise account. Here, the Admin can manage and control the users they added to their Enterprise account. Here’s a brief look at the different columns that make up the Company Details:
- User Details - displays the full name, username, and profile picture of the User
- Email Address - displays the email address of the User
- Contact Number - displays the phone number of the User
- Connected Accounts - displays the social media accounts that the User has connected their Inphlu account to
- Role - displays the Enterprise role the User was given by Admin/what level of access they have to the Inphlu Enterprise account
-
Here’s a description of each one:
-
Administrator - is the Admin who can see and do everything on the platform/has the power of all of the other roles
-
Manager - is someone who can add and remove users in the Company Details and Teams (they can see all of the Teams that the Admin(s) has/have set up). They don’t have access to the Company Analytics or the Shared Post Analytics of anyone else. Still, they have access to everything else, such as generating, creating, and sharing posts.
-
Data Analyst - can look at the Company Analytics and the Shared Post Analytics of all other users. They see the same information/data that the Admin sees in the Company Analytics and Shared Post Analytics of all other users (they can toggle their views between them). They can’t add or remove users in the Company Details or Teams (they can see all of the Teams that the Admin(s) and Manager(s) have set up, though), but they do have the ability to generate, create, and share posts.
-
Content Creator - someone who can generate and share content with others. They can have access to the Teams that the Admin(s) and Manager(s) has/have set up so they can share content properly with all users on the Enterprise account. However, they can’t access the Company Details, Company Analytics, or Shared Post Analytics of anyone else or add or remove users from a Team.
-
Company User - is a regular user. They can only generate or create posts if they are given permission by an Admin or Manager.
-
-
- Level - displays the level of the User.
- Onboarding Completed - displays if the User still needs to complete the onboarding.
- Automatic Posting - displays if the User opted in or out for automatic Posting.
- Generate Post Access - displays whether the ability for the User to generate and create posts has been turned on or off.
- Last Login - displays the date the User last logged into their Inphlu account.
- Last Published Post - displays the date the User last published a post on
The pencil icon at the far right side allows you to edit some of the User’s details like the email address, contact number, role, etc.
The trash can icon at the far right side of the table allows you to delete/remove a user.
Tip: If you’re searching for one specific user, you can search for them using the search bar at the top of the table.
Tip: If you want to sort through the Company Details quickly, you can click the top of a column to help change the order.
Note: If you are still looking for all of the users in the Company Details, check to see if there’s another page by looking at the bottom right corner of the table.
Tip: You can expand the table so that there aren’t only ten users on display by default by changing the dropdown in the bottom left corner of the table to increase the number of users allowed to be in the table at one time.
At the top of the table, you’ll see a bunch of different buttons which could potentially be confusing, so let’s walk through what each of those does:
- Delete - it simply deletes any users you have checked the checkbox of (the checkbox is on the far right side of the table)
- Add to Team - it allows you to add the users you have checked the checkbox of to any pre-existing team that you would like
- Download CSV - download an example of what the format needs to be in Excel to upload a bunch of users in bulk to the Company Details.
- Import Members (CSV) - upload an Excel sheet to add a bunch of users in bulk to your Enterprise account (the Excel sheet has to be in the correct format for this to work)
- Add New Member - you can add a new member/user to your Enterprise account.
- Onboarding QR - more ways you can go about adding a new member/user to your Enterprise account
Adding New Users
You can use multiple ways or methods to add new users to your Enterprise account.

The first method of adding a new user is to use the Add New Member button, which will bring up a pop-up like the one pictured. Here you will have to provide/input the User’s full name, username, email address, phone number, and role in the Enterprise account. You will also have the option of adding the new User to a Team immediately.
If you use this method to add a new user, the User will be sent a welcome email and text with a link to the onboarding so they can get started with using Inphlu right away.
The second method of adding a new user is to use the Download CSV and Import Members (CSV) buttons. In addition, if you download the sample Excel sheet, you can see what information and format are needed to add new users in bulk to your Enterprise account.

The third method of adding a new user is to use the QR code found in the Onboarding QR button. You can download and share the QR code in the Onboarding QR button with others so that they can scan it and be taken to the onboarding immediately. Of course, they’ll have to fill out their own information this time, but at the end of the onboarding, they’ll be added to your Enterprise account.
Note: If the QR code method is used, please make sure that the person scanning it opens up the onboarding in a Google Chrome, Mozilla Firefox, or Microsoft Edge browser.
The fourth method of adding a new user is to copy the link found in the Onboarding QR button. You can share this link with others, and if they put it into their browser, they’ll immediately be taken to the onboarding. Like the QR code method, they’ll have to fill out their own information, but by the end of the onboarding, they’ll be added to your Enterprise account.
Teams

In the Teams section of the Company Details tab, you can create Teams from the users you’ve added to your Company Details/Enterprise account.
Teams are simply users the Admin user groups together to make sharing content with others easier. All you need to do to create a Team is to input the Team’s name and choose which users you wish to be part of the new Team.
Once a team is created, you can see the newly created Team appear in the table below alongside any other teams you may have already created.
Tip: If you’re searching for one particular Team, you can search for them using the search bar at the top of the table.
Tip: If you want to sort through the Teams quickly, you can click the top of a column to help change the order.
Note: If you are still looking for all the Teams in the Teams section, check to see if there’s another page by looking at the bottom right corner of the table.
Tip: You can expand the table so that there aren’t only ten entries on display by default by changing the dropdown in the bottom left corner of the table to increase the number of entries allowed to be in the table at one time.
Congratulations! You’ve reached the end of the help documents! So go and start using Inphlu to help you accomplish your social media goals!